Home Assistant Switch Timer With Tasmota Pulsetime
Motivation
I have several switches in my house and garden which can be controlled from Home Assistant. But sometimes I forget to turn them off. So there are some lights in the garden which should turn off after a certain time. For example I almost always forgot to turn off the light which directed to front gate of my garden after my arrives home.
All of my devices are flahed with Tasmota firmware. Tasmota has a built in command to turn off the relay after certain period of time called "Pulsetime":
Quote
PulseTime
0 / OFF = disable use of PulseTime for Relay
1..111 = set PulseTime for Relay
112..64900 = set PulseTime for Relay
Note if you have more than 8 relays:
Defined PulseTime for relays <1-8> will also be active for correspondent Relay <9-16>.
My goal is to set this PulseTime value from my Home Assistant dashboard. There are several ways to achieve my goal, but I wanted to use the "native" Tasmota way. Maybe the only noticeable reason for using PulsTime is that this solution work even if the Home Assistant server or the network become unavailable, and you turn on your light with a button or switch. Many Sonoff device have button on them with which you can control the device without network connection.
Most of you may want to use the Home Assistant Timer function, and there are a lot of article about this topic on the Internet, but not much which focus on the PulseTime feature.
Before we begin I show you how it works, and you can decide to read more or leave. :D
Here is a picture of my controlling Dashboard:
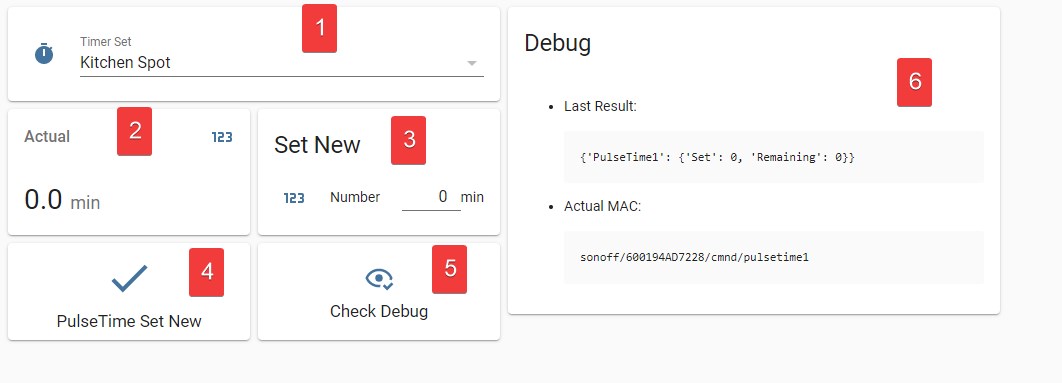
I will refer to this picture a lot later in this post as Fig 1.
- Drop Down list: You can select which device do you want to set up.
- Helper Name:
input_select.timer_set - Related Automation: Changing The Device In The Dropdown List
- Helper Name:
- Actual Value: This widget show you the actual value of the selected device. This box is automatically updated right after you select the device from the Drop Down list.
- Helper Name:
input_number.pulsetimeactualvalue - Related Automation: Catch MQTT Message
- Helper Name:
- Input field: You can specify the new value. Right after you typed the new number the PulseTime value is sent to the device via MQTT. Meanwhile the Actual value also updated.
- Helper Name:
input_number.number - Related Automation: Set New PulseTime Value
- Helper Name:
- Button for send the command to the device. This can be useful if you want to set the same value for several devices. Select the first device, set the new value, then select another device and without typing the value just push the button. This button is also useful if the device did not get the message for some reason and you want to resend.
- Related Script: PulseTime Set New
- This button updates the "Debug" Markdown filed (6.). The 5. and 6. elements are optional and only for debugging.
- Related Script: Check Debug
I try to explain my solution as detailed as I can, and I hope you will be able to adopt it to your setup if you want.
End Device Configuration (Tasmota - MQTT)
Topic
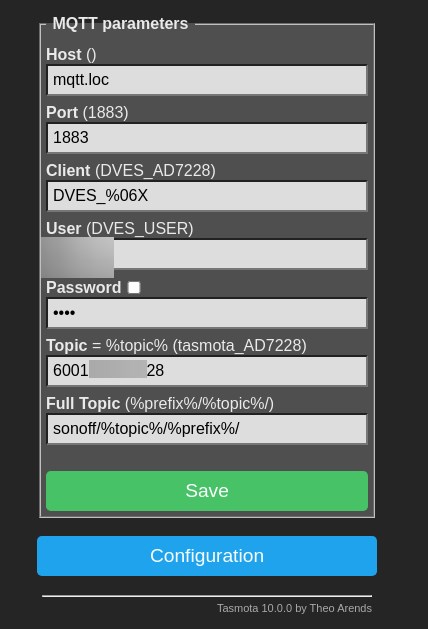
The first and really important thing is to see how I use the mqtt device topic.
This is my schema: sonoff/[DEVICE MAC ADDRESS]/[%prefix%]
Info
I use the MAC address without colons. Example: AABBCCDDEE or 1E2F3D4C5A
Screenshot Example
Topic examples:
- Command:
sonoff/600194AD2A3C/cmnd/power - Command:
sonoff/tasmotas/cmnd/status - State:
sonoff/600194AD2A3C/tele/STATE - Status:
sonoff/600194AD2A3C/stat/STATUS
Why I am using MAC address? Although MAC address is not so human friendly, but unique and clearly identifies the device. Example: You can easily find the device in your router if you are using DHCP. But, later you will see that no matter what topic you are using, it does not effect the PulseTime configuration much, you just have to understand how it works and adopt your to topic.
Home Assistant Integration
Official documentation: https://www.home-assistant.io/integrations/tasmota/
Important options:
- Native discovery:
SetOption19 0 SetOption30 0for switches. (default)SetOption30 1for lights.- (Optional)
GroupTopic1 tasmotas
Other useful commands (Using Grouptopic and MQTT):
- Set Timezone according my country.
- Set
teleperiodto 30 secs - Set Syslog server
- Display hostname and IP address in GUI
Home Assistant - Helpers
We have to configure some helpers on the webUI: Configuration-->Helpers
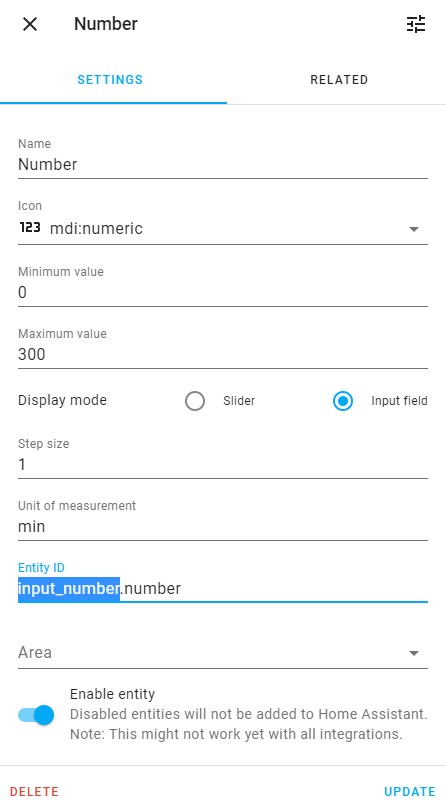
New Value
- Fig 1 / 3
- Helper name:
input_number.number(Sorry for the naming :) )
This Helper is responsible for storing the new Pulsetime value.
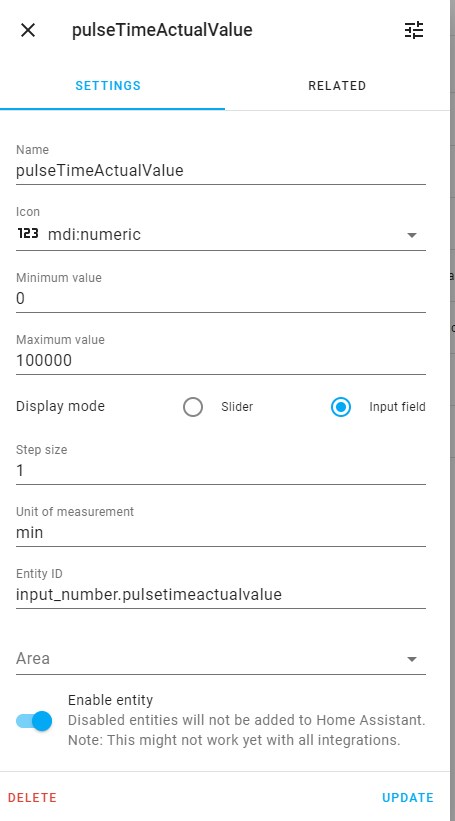
Actual Value
- Fig 1 / 2
- Helper name:
input_number.pulsetimeactualvalue
This Helper holds the actual value of the selected Device.
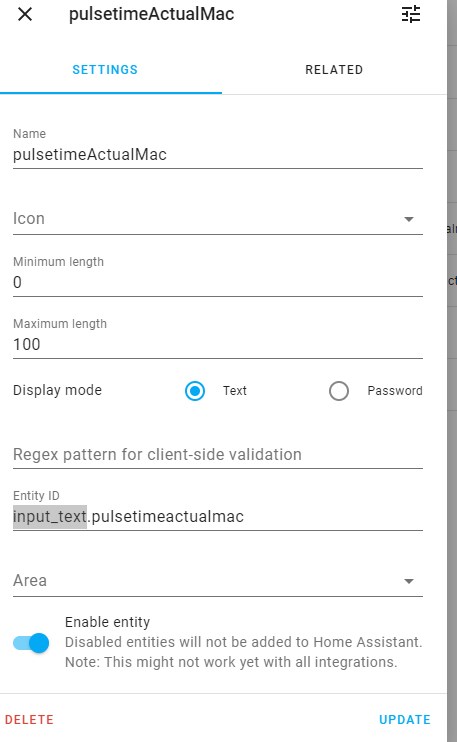
Actual MAC
- Fig 1 / 6 (Actual MAC)
- Helper name:
input_text.pulsetimeactualmac
This will store the actual topic, and displayed in the debug box. (Sorry for the naming, again)
Last Result Message
- Fig 1 / 6 (Last Result)
- Helper name:
input_text.result
This stores the MQTT message from the device.

Example message:
Unfortunately tasmota don't send the actual PulseTime value with any of the tele messages, thus manually trigger is required. There are two situation when tasmota reply with this message:
- When you set up a new value.
sonoff/BCDDC2802856/cmnd/pulsetime1 -m 1000 - Or send
nullmessage to the above topic.sonoff/BCDDC2802856/cmnd/pulsetime1 -n
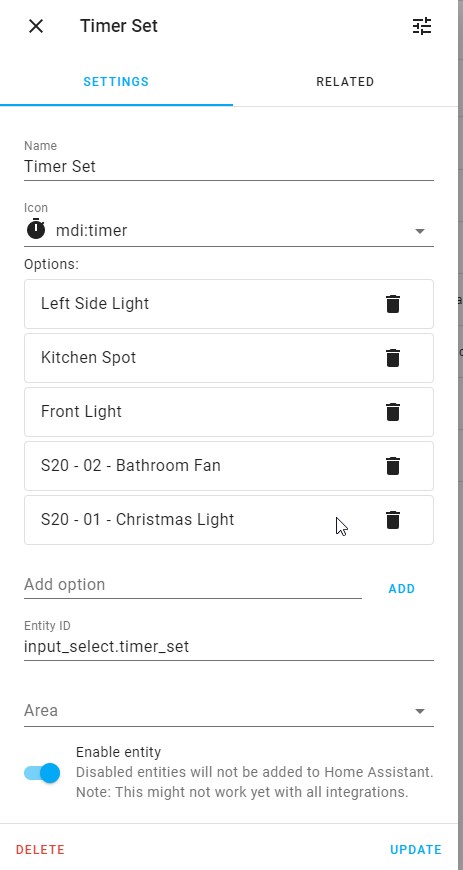
Drop Down list
- Fig 1 / 1
- Helper name:
input_select.timer_set
Here we build a list contains all the device which we want to use with Pulsetime. You can use human readable name or whatever you want.
Home Assistant - Automations
Changing The Device In The Dropdown List
Trigger
This automation is triggered immediately after you have selected a new device form the drop down list.
Action
As you can see we have one trigger and two actions.
The trigger is really simple: this automation is triggered when you select another device, as I wrote before.
We have to create a mapper to know which topic is mapped to the selected device. This was the hardest part of the whole project, figure out how to create relation between the selected device name and the topic to which we send messages. You may think it would be easier if I used the name of the device in the topic instead of the MAC address. But no. I have some 4CH sonoff device, and in this case the we have different Pulstime values for each channel. (Pulsetime1, Pulsetime2 . . .) So we need exact match between the selected equipment (switch) and the device plus the channel number. This mapper was the best solution I could find.
Caution
You have to specify the exact text here which you entered in the input_select helpers (case sensitive and check the leading and trailing white spaces twice)
So the input_text.pulsetimeactualmac will be either one of the topic or UNKNOWN if no mapper found.
The other action (mqtt.publish) publishes the previously selected topic using the mapper. Notice that we don't have message part here, just the topic. As I mentioned earlier this way the tasmota device will reply with the actual value in JSON format. To better understanding here is an example with Mosquitto:
mosquitto_pub -h [MQTT HOST] -u [MQTT USERNAME] -P [MQTT PASSWORD] -t 'sonoff/BCDDC2802856/cmnd/pulsetime1' -n
Reply:
We have two goals with this JSON message:
- Store the "Set" value (0) to
input_number.pulsetimeactualvaluehelper. - Store the entire JSON message to
input_text.resulthelper for debugging.
But to achive this we need another automation which I named "Catch MQTT Message" and the subject of the next chapter.
So the mqtt.publish action publishes sonoff/BCDDC2802856/cmnd/pulsetime1 and we store the entire JSON {"PulseTime1":{"Set":0,"Remaining":0}} to input_text.result for debugging, and the '0' to input_number.pulsetimeactualvalue.
Download entire yaml: hass-automation-dropdown.yaml
Catch MQTT Message
Let's see how we handle the received message.
Trigger
We subsribed for the sonoff/+/stat/RESULT topic.
Info
If you need explanation about what the + sign means please visit this site: https://www.hivemq.com/blog/mqtt-essentials-part-5-mqtt-topics-best-practices/
With one world: single-level wild card.
Ok. But we have a problem. Tasmota may publish other result messages than Pulsetime. For example when a light turned on or off. Example:
sonoff/6001949C6548/stat/RESULT {"POWER1":"ON"}
sonoff/6001949C6548/stat/RESULT {"POWER2":"ON"}
sonoff/DC4F22378237/stat/RESULT {"POWER":"ON"}
sonoff/6001949C6548/stat/RESULT {"POWER3":"ON"}
sonoff/6001949C6548/stat/RESULT {"POWER4":"ON"}
sonoff/6001949C6548/stat/RESULT {"POWER1":"OFF"}
sonoff/DC4F22378237/stat/RESULT {"POWER":"OFF"}
sonoff/6001949C6548/stat/RESULT {"POWER2":"OFF"}
sonoff/6001949C6548/stat/RESULT {"POWER3":"OFF"}
sonoff/6001949C6548/stat/RESULT {"POWER4":"OFF"}
This will cause error when we try to parese the json... I want to explain what I'm talking about through an example.
As we discussed earlier we need the actual pulsetime from the device/channel. We can parse the JSON like this:
But what happens with the {"POWER4":"OFF"} message:
We got a big null. To avoid error or warn messages in the Home Assistant log we should filter the messages and process only the relevants. That's why we have condition.
Conditions
The first is a really simple condition. If the received JSON contains PulseTime we proceed to the Actions.
The second is a bit more complicated. We have to be sure that the MQTT message came from the right device. Why? I explain you:
You selected the "Kitchen Spot" from the drop down list. The input_number.pulseTimeActualValue and input_text.pulsetimeactualmac set according to the selection. That's rigth. But if you send PulseTime1 command to another device for example from the WebUI, the Automation is triggerd and set the wrong values. Simply: we need to check the MAC address and "Pulstime" word, as well.
Actions
When a new device is selected from the drop down list (Fig 1 / 1) we want to tihngs:
- See the actual value (Fig 1 / 2) - The first action is responsible for this (
input_number.set_value) - Display the entire JSON in the Debug box (Fig 1 / 6) The second action will do this (
input_text.set_value)
Do remember that this Automation is closely connected to the previos one. We can say that the result of previously discussed Automation triggers this one:
- You select a new device from the drop down list
- "Changing The Device In The Dropdown List" Automation is triggerdm and publish MQTT message.
- This Automation catches the MQTT JSON message and process it.
The first action set the value of input_number.pulseTimeActualValue helper. But we have problem again. What about the multi-channel devices? We want to cofigure each channel separately, right? So we have to figure out the received message related to which channel? I've solved this problem with some if - elif cndition: If the JSON playload contains "PulseTime1" than we parse the json and store the value of the "Set" into the pulseTime variable.
Maybe this block have to be mentioned, as well:
This all magic because of this behaviour:
Quota
112..64900 = set PulseTime for Relay
- If we get
0it means0--> PulseTime is disabled - If we get for example
160it means160 - 100=60seconds (1min).
The second action (input_text.set_value) simply set the input_text.result helper value to the entire JSON message.
Downlaod entire yaml: hass-automation-catchmqtt.yaml
Set New PulseTime Value
Now we have only one Automation left to discuss. Everything we did before is useless if we can't set new value. This Automation is intended for do this. I can say that this is the most simpler from all. Everithing is prepared in the previous automations, so the only purpose of this automation is to set the desired new value.
Trigger
Simple trigger: when a new value is set. I think no explanation is required.
Action
As we discussed earlier tasmota handle the pulsetime in a bit strange way. Do remember what we did, when we needed to transform the received value:
Now we should do the opposite:
What does {% if timer == 100 %} mean?
If you set the PulseTime value to zero (disable pulsetime): 0 * 60 + 100 = 100
That's why we need to specially handle the 100 value.
Quota
112..64900 = set PulseTime for Relay
Download entire yaml: hass-automation-setnew.yaml
Home Assistant Scipts
Ok we are almost done. Only two part we have to mention. Do you remember the "PulseTime Set New" and "Check Debug" buttons (Fig 1 / 4 and 5)?
Hint
I don't provide download link to scripts, because the entire scripts are copied here.
PulseTime Set New
I think every part of this script is discussed earlier and I don't want to repeat myself. :D
Check Debug
Simply publish to topic stored in input_text.pulsetimeactualmac helper.
Home Assistant Dashboard
For your convenience I share the dashboard I use (Fig 1). Here you can check how each components are used.
Summary
I do know that there are several other easier ways to achieve this functionality, but I think using Tasmota native Pulsetime feature is a good approach.
Thank you for reading, and hope this article (or some parts of it) was helpful for you.